Setting up IoT Edge Gateway on Hyper-V
Set up the Hyper-V Manager on your Windows Machine
Connect to the Virtual Machines
- Start the VM.
Configure Proxy
- On the Utility VM, open Internet Explorer.
- Click the gear icon in the top right corner.
- Navigate to Internet Options > Connections > LAN Settings.
- Under Proxy Server, enable the Use a proxy server… option.
- Fill in the proxy address and the port.
- Enable the checkbox Bypass proxy server for local addresses.
- Click Ok.
Install Notepad++
- While still on Internet Explorer, download and install Notepad++.
Install Hyper-V Manager
- On the Utility VM, right-click the Windows icon.
- Open Apps and Features (First option).
- Scroll to the bottom.
- Open Programs and Features under the Related settings section.
- On the left panel, open Turn Windows features on or off.
- Open the Hyper-V tree and enable the checkbox Hyper-V Management Tools.
- Hyper-V Manager will now be installed.
Add the Hypervisor to the hosts file
- Still on the Utility VM, open file explorer.
- Navigate to
C:\Windows\System32\drivers\etc. - Right-click the HOSTS file and open it with Notepad++.
- On the bottom line, add the following
[IP of hypervisor] [Name of Hypervisor]. - Save the file.
- Click Yes to open as an administrator.
- Save again.
The name of the Hypervisor can be obtained by typing hostname in the cmd line.
Configure the local group policy
- Still on the Utility VM, open Settings.
- Search for Edit Group Policy.
- Under Console Root\Local Computer Policy\Computer Configuration\Administrative Templates\System\Credentials Delegation, enable the Allow delegating fresh credentials with NTLM-only server authentication.
- Add the server to the list
wsman/{HOSTNAME}. - Click Ok, Apply, and Ok again.
Set up winrm
- On the Hypervisor, execute the following command:
winrm quickconfig. - Press
y.
Connect Hyper-V Manager to the Hypervisor
- On the Utility VM, right-click the Hyper-V Manager in the left panel.
- Click Connect to Server….
- Select Another Computer.
- Fill in the Hypervisor’s device name.
- Enable the checkbox Connect as another user.
- Click Set User….
- Fill in the username
D30\Administrator. - Fill in the default Hypervisor password.
- Click Ok.
Set up the Virtual Appliance for Hyper-V and Virtual Box
This article will explain how you set up the Virtual Appliance in an existing VM.
Pre-requisites:
- Hypervisor set up in the Utility VM.
- IoTHub enrollmend created in the DPS.
Get the VM Ready
-
Start the VM.
-
Log in with the following credentials:
ubuntu, ubuntu. -
To set a temporary static IP, edit the Netplan file by executing the following command:
sudo nano /etc/netplan/50-cloud-init.yaml -
Fill in the variables using the IP setting of your current plant. Make sure you use the same IP as the VM you stopped in the above steps.
noteThe first address is the PRD or ACC VM address, not the one of the Hypervisor. The gateway and the DNS server names can be found by typing 'ipconfig /all' in the Hypervisor command line.
-
Save with ctrl+x > y > enter.
-
To set the IP, execute the following command:
sudo netplan apply -
Connect to the virtual machine via PowerShell on the Utility VM, execute the following command:
ssh ubuntu@[IP of VM] -
Log in with the Ubuntu credentials again.
noteIt's easier to connect to the virtual machine via PowerShell as it allows easy copying and pasting.
Deploy the Virtual Appliance
-
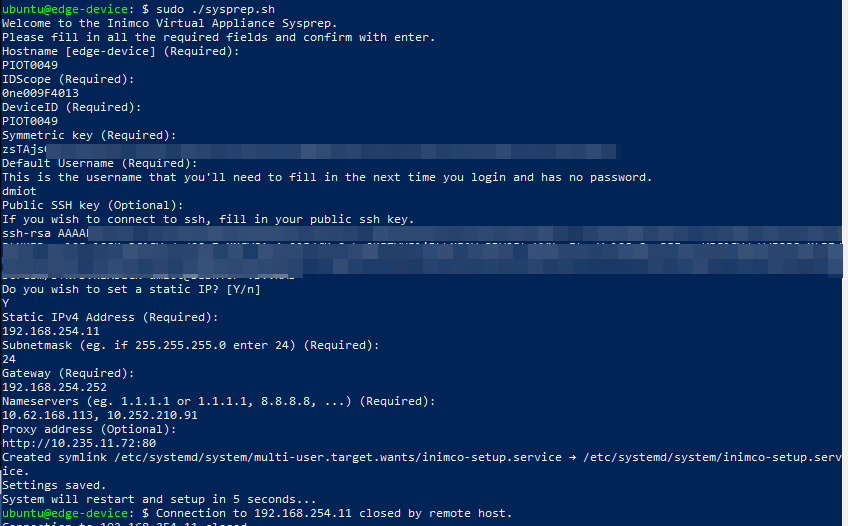
While connected to the Linux VM you just created via SSH on the Utility VM, execute the Sysprep script:
sudo ./sysprep.sh -
Fill in the fields as requested:

| Field | Description | Required / Optional |
|---|---|---|
| Hostname | Name of VM | Required |
| IDScope | Can be copied from the Azure IoT Hub Device Provisioning Service | Required |
| DeviceID | Same as Hostname, which is the name of VM | Required |
| Symmetric key | Can be copied from the individual enrollment in DPS | Required |
| Default Username | Your default username | Required |
| Public SSH key | Public SSH key, if set up | Optional |
| Static IP | Y | Required |
| Static IPv4 Address | The assigned IP address of the original VM | Required |
| Subnet Mask | The subnet mask of the network. Can be found by typing ipconfig /all in the Hypervisor cmd line. Make sure to use the prefix notation. | Required |
| Gateway | Can be found by typing ipconfig /all in the Hypervisor cmd line. | Required |
| Nameservers | The DNS server names can be found by typing ipconfig /all in the Hypervisor cmd line. | Required |
| Proxy address | Proxy server address | Optional |
-
The VM will now restart and install the required applications and settings. Wait until the machine has restarted a second time.
-
You can now log in with the username you set over SSH. Upon first login, you will have to specify a new password as no password is set. You will be logged out as the new password is set, but due to certificate login, you no longer need the password to log in.